Cupcake Rampage: Frosting 101

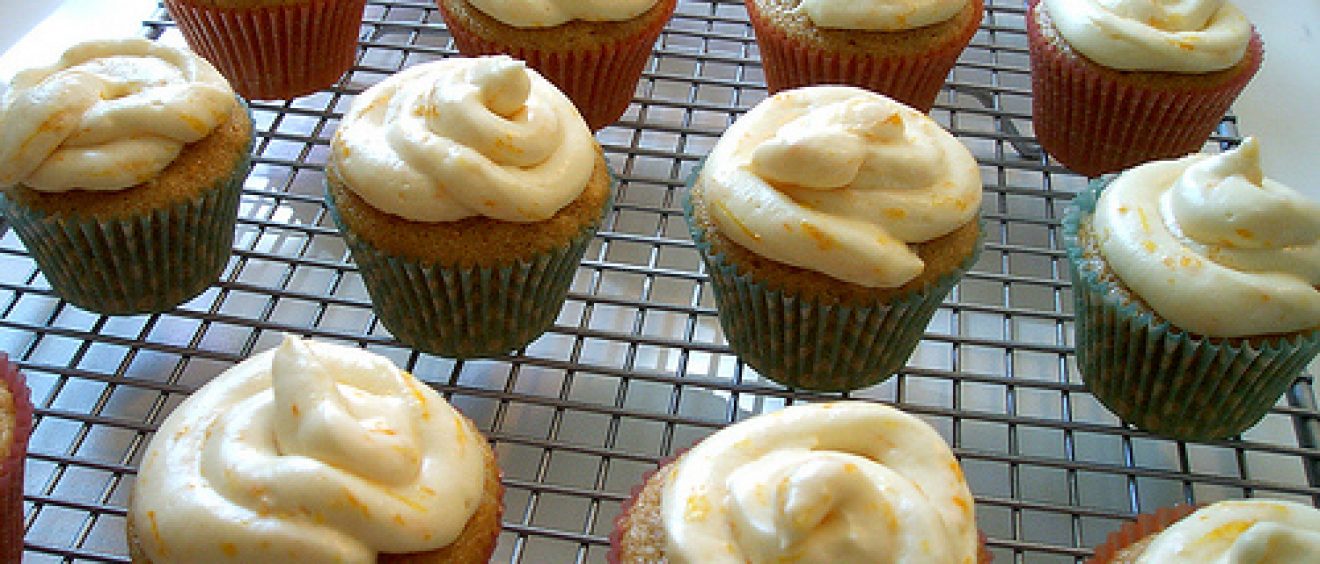
Mini vegan orange vanilla cupcakes with orange buttercream, adapted from Vegan Cupcakes Take Over The World.
Even though I’m only a recent arrival to the home baking scene, I’m an even more recent convert to the merits of frosting. Like any newbie fumbling and grasping about for a culinary bra clasp, I started out with a battery of failures, but once I got the basics and the wheels came off, an iconoclastic cockiness set in. Paper liners? We don’t need no stupid cupcake diapers! We’ll bake these bad boys commando! Sprinkles? Say “sprinkles” again! I dare you! I double dare you! Frosting? Pah! Frosting is the opiate of the baking world! People’s tongues have become numb with sugar and can no longer appreciate the subtlety of pure, unadulterated, naked cupcake meat!
Of course, I learned my lesson. Paper liners don’t just ease cleanup, they can provide a color accent and give people that Christmas morning feeling of unwrapping a gift just for them. Sprinkles and other garnishes may be little more than pieces of flair on the uniform of a baked good, but remember, half of your score comes from presentation. And frosting? Well, if cupcakes make the world go around, then frosting is the axis upon which it spins.
Making your own frosting is one of the easiest things in the world to do. While it isn’t necessarily cheaper than store-bought frosting, it does allow you to control the quality and quantity of the ingredients that go into it. My basic guide, after the jump…
Mother Buttercream Frosting
This recipe will make enough frosting to generously top a dozen cupcakes, with enough left over for you to lick the bowl. For the sake of succinctness, we’re using the term “butter” to mean any solid fat, including margarine or Earth Balance, which work just as well.
- 1/4 cup (4 tablespoons) room temperature butter (or other solid fat)
- 1/4 (4 tablespoons) room temperature vegetable shortening
- 1 1/2 to 2 cups powdered sugar
- 1 to 1 1/2 teaspoons vanilla extract
All frostings at their core are made up of three basic ingredients: fat, sugar, and additional flavoring. The fat is almost always a ratio of butter to vegetable shortening; usually between 3:1 and (but no more than) 1:1, respectively.
Why not just use all butter or all shortening? Well, both ingredients have strengths and weaknesses, and by using them together we get the best of their best while minimizing their drawbacks. Butter obviously lends flavor, but an all-butter buttercream would taste too much like butter and overwhelm any additional flavors. While butter breaks down at relatively low temperatures, shortening is shelf-stable, which will give the resulting frosting that much more resilience, keeping swirls from liquefying and falling down. The neutral taste of shortening will also cut butter’s dominance without creating a weird flavor combination.
Some baking recipes, especially those from the American South, call for cream cheese frosting. Simply swap out the butter for softened cream cheese and proceed as if nothing happened.
In a large, high-sided bowl, mash the butter and shortening together briefly until just combined.
While you can easily use a fork for this first step, utilizing an electric mixer is almost a necessity here to achieve a final product with proper fluffiness and smoothness. A high-sided bowl is recommended to contain the aerosol effect that powdered sugar achieves when it gets agitated.
Working in half-cup installments, mix in the powdered sugar using the lowest speed on your mixer, stopping when you no longer see just butter and sugar, just a homogeneous paste.
In the wizarding-like world of baking, this is called the creaming method, and its purpose is to use the sugar crystals to cut tiny holes into the butter and then pump those holes full of air, thus increasing the overall volume. The speed and amount of time you spend creaming will ultimately determine how your frosting ends up. Low speeds cut less and pump less air, and create a thicker, creamier frosting. Higher speeds cut more and blow more air, resulting in a lighter, fluffier frosting.
Once you’ve incorporated in a cup and a half of the sugar, stop and take a look at your frosting so far. Lift up the beaters and check the thickness and consistency, taste it to see how sweet it is. You may not need to add any more sugar at this point, but if you decide that you have to, add the vanilla and mix again for at least another two minutes, until the frosting is smooth and takes on a satin-like look:

Looks good enough to sleep in.
If you feel your frosting needs tweaking, add in some more sugar a quarter of a cup at a time to fluff it up some more, or a teaspoon of milk to loosen it up a bit.
One of the other advantages to making your own frosting is the option to customize the flavor. Anytime after hitting the wall with the sugar and adding the vanilla, but before the final two-minute mix, feel free to add in any last-minute flavorings:
- extracts: (mint, almond, maple, etc.) up to 1 teaspoon
- citrus zests: (orange, lemon, lime) up to 1 tablespoon
- other flavors: (strong coffee, rum, orange juice, etc.) up to 2 teaspoons
Keep in mind that the flavorings added at the end will be the only real liquids in the frosting, and are best kept to a minimum, as an excess of moisture can damage the network of air bubbles created by the mixing, causing the frosting to separate into a gross, untenable, primordial soup.
After the final mix, store your frosting in the refrigerator in an airtight container until ready to use. Before spreading or piping it onto your (cooled) baked goods, let the frosting sit out for fifteen or twenty minutes to limber it up a bit.
We’ll save the cupcake-versus-muffin debate for another day.
Find more cupcake recipes in Endless Cupcakes

**licking my screen**
Those do look tasty! I’m always impressed with how wonderful tasting vegan baked goods can be. Yummy!
You are so freaking hilarious, this first paragraph is classic! Thanks for sharing your secrets!
I love this…. Yummy
Great looking frosting! It does look good enough to sleep in 😉